Apple iPhone 15 and 15 Plus Review

Finally, a clear upgrade: Apple iPhone 15 and 15 Plus Review

iPhone 15 In a nutshell

The Apple iPhone 15 isn’t just a bit cheaper than its predecessor; it also boasts much-improved specifications. The device feels more comfortable in hand and features a new screen with Dynamic Island, delivering excellent color reproduction and significantly higher peak brightness compared to the old model.

However, the 60Hz refresh rate is a bit outdated. The new 48-megapixel main camera captures incredibly sharp photos, and even the non-Pro iPhone finally gets a decent zoom function, as long as you’re not zooming in too far. The ultrawide camera is a bit dated, and the absence of a macro function is noticeable. The iPhone 15’s battery life is slightly better than its predecessor, making it the longest-lasting among smaller phones. Unfortunately, despite the switch to USB-C, charging is still not as fast as one would hope. The A16 chip isn’t groundbreaking, but it’s speedy, and users can expect long-term software updates

Pros: Fast hardware and software Bright display with excellent color reproduction Sharp main camera Long battery life

Cons: Slow charging Screen still has a 60Hz refresh rate Lagging ultrawide camera without macro functionality

Over the past few years, those who opted for a regular iPhone didn’t get much in return.

Creating a non-Pro iPhone is indeed a tricky balancing act. Apple has to ensure that a device has enough innovations compared to its predecessor to be a solid standalone choice. At the same time, it shouldn’t become so high-end that it threatens the Pro series. After all, there must be a good reason to spend well over a thousand bucks on a phone.

Three years ago, when Apple last gave its iPhones a major refresh, the added value of the Pro version was limited.

The iPhone 12, compared to the iPhone 12 Pro, had almost the same design, the same cameras minus a telephoto lens, and a nearly equally good display. In the following years, the flagship models in the Pro series received increasingly impressive cameras, better displays, and faster chips in their more luxurious-designed casings.

Improvements for iPhones with only a numeral suffix came more slowly, and last year they were almost non-existent. Not only did the iPhone 14 start to lag behind smartphones from other manufacturers, especially in terms of screen brightness and camera quality, but you could also just as well purchase an iPhone 13, which remained readily available last year and was even cheaper than the new model.

With the iPhone 15 series, Apple’s ‘mid-ranger’ takes a bigger leap forward again, considering you can still call a device that costs almost 1000 euros that.

The device features the updated screen with rounded corners, Dynamic Island, and higher peak brightness, which was already present on the iPhone 14 Pro last year, along with a 48-megapixel camera that allows for a two-fold zoom without a significant drop in image quality. The iPhone 15 still lacks a dedicated telephoto lens, like most expensive devices, so the 48-megapixel camera is a welcome addition. Lastly, the USB-C port could be a reason to upgrade, just like with the iPhone 15 Pro and 15 Pro Max. Following the lead of the European Commission, we are finally getting closer to a world where you only need one cable to charge all your devices.

Alongside the iPhone 15, Apple is also releasing an iPhone 15 Plus, with a screen size equal to the iPhone 15 Pro Max but at a lower price than the smaller iPhone 15 Pro.

Speaking of prices: where Apple significantly increased prices last year, the iPhone 15 and 15 Plus are actually a few tens of euros cheaper than their predecessors.

Smoother design, much brighter display

259 Facebook Linkedin X The iPhone 15 and 15 Plus bear a much closer resemblance to the 15 Pro and 15 Pro Max than the iPhone 14 and 14 Plus did to their Pro counterparts in that year. That is, from the front. From the back, the difference with the more luxurious models is quite noticeable. The iPhone 15 and 15 Plus come in cheerful, light pastel colors and feature a slightly smaller camera bump, housing two lenses instead of three.

The Pro iPhones have matte glass with a subtle glow, a feature absent in the ‘regular’ iPhone 15 models. While the side edge of the iPhone 15 and 15 Plus is made of aluminum, the frame of the 15 Pro models boasts a brushed titanium finish.

The edge of the iPhone 15 series is slightly more rounded compared to the iPhone 12 through 14. The front and back remain entirely flat.

In hand, the rounded edge makes a more significant difference than I initially expected, especially if you’re not using a case. Due to the less sharp transition between the front and the side, the new iPhones feel much better to hold. I find the iPhone 15, without a case, even more comfortable than the iPhone Xs and 11. Those had a rounder edge, but also some sharp transitions around the speaker holes and Lightning port at the bottom, which could be a bit uncomfortable in hand.

As is well known, the iPhone 15 and 15 Plus no longer feature Lightning but have adopted USB-C.

Otherwise, all buttons and ports are in the expected locations where they were in previous models: the power button on the right, the volume buttons on the left, with the traditional silent switch above them. The Pro models this year introduce the new Action button in that space. Since Apple often introduces innovations on Pro models one year and brings them to non-Pro models the following year, the iPhone 15 and 15 Plus could be the last iPhones with the traditional silent switch.

In terms of dimensions and weight, the iPhone 15 and 15 Plus differ only slightly from their predecessors.

While not a true ‘mini,’ the iPhone 15 is, by current standards, the next best thing; it’s slightly larger than the ASUS ZenFone 10 and almost the same size as the Samsung Galaxy S23. On the other hand, the iPhone 15 Plus is a relatively large device, comparable in size to the average Android flagship.

Unless you have very large hands, this is likely a phone to be operated with two hands, although we appreciate that Apple has managed to make it slightly narrower compared to its predecessor.

Similar to previous iPhones, the iPhone 15 and 15 Plus feature Ceramic Shield on the front,

Apple’s equivalent of Gorilla Glass, protecting the screen like most other phones. There is no reinforced glass on the back of the iPhones. The IP68 certification remains the same, promising thirty minutes of water resistance up to six meters deep.

Still no 120Hz display, but higher brightness The OLED screen of the iPhone 15 and 15 Plus follows the same design as that of the 14 Pro and 14 Pro Max,

featuring the Dynamic Island instead of a notch, but without the ultra-thin screen borders of the 15 Pro and 15 Pro Max. The relatively large cutout in the screen is not always aesthetically pleasing but serves as a convenient status bar for various information that, on iPhones with a notch, is dispersed in different places in iOS.

In addition to notifications about the battery or pairing Bluetooth accessories, the bar sometimes also contains small widgets that can be enlarged with a tap on the bar.

A smooth 120Hz screen refresh and the always-on display feature remain exclusive Pro features for the iPhone 15 series.

This is disappointing, especially considering that you can buy phones from other brands with both functions for as little as 300 euros. The less smooth 60Hz screen refresh on the iPhone 15 and 15 Plus doesn’t hinder practical use; it may only appear a bit jerky when compared to a 120Hz iPhone.

The absence of the always-on display feature is a practical drawback, as you need to turn on the screen each time you want to check your notifications. The new Stand-by feature in iOS 17 (see page 5) is much less useful without the always-on display.

We measured the screen of the Apple iPhone 15 and 15 Plus using our SpectraCal C6 colorimeter and Portrait Displays Calman Ultimate analysis software.

For the measurement, we don’t need to choose a color mode because iPhones don’t have them; we do, however, turn off True Tone (default enabled). With this feature, the screen automatically adjusts its color temperature based on ambient light. There aren’t many other phones that can do this yet.


Samsung watch

Samsung Watches, why are they so good?

Samsung watches have gained a reputation for being highly regarded in the smartwatch market due to several compelling reasons. Here are some key factors that contribute to the popularity of Samsung watches and why they are considered so good:

  1. Design and Build Quality: Samsung puts a strong emphasis on design and build quality, creating watches that are both stylish and durable. The combination of premium materials, sleek aesthetics, and attention to detail makes Samsung watches appealing to users who appreciate a sophisticated and modern look.
  2. Versatility and Customization: Samsung offers a wide range of watch models, from fitness-oriented options like the Galaxy Watch Active series to more traditional smartwatches like the Galaxy Watch series. This variety allows users to find a watch that suits their individual needs and preferences. Additionally, the ability to switch watch bands and customize watch faces further enhances the versatility of Samsung watches.
  3. Brilliant Displays: Samsung watches boast vibrant and high-quality displays, making it easy to read notifications, view fitness metrics, and interact with apps. The use of AMOLED technology provides sharp colors and excellent contrast, resulting in an immersive user experience.
  4. Seamless Integration with Samsung Devices: Samsung watches are designed to seamlessly integrate with other Samsung devices, creating a cohesive ecosystem. They work seamlessly with Samsung smartphones, allowing users to access their apps, messages, and notifications directly from their wrist.
  5. Health and Fitness Features: Samsung has invested in developing robust health and fitness features for their watches. From heart rate monitoring and sleep tracking to workout tracking and stress management, Samsung watches cater to fitness enthusiasts and those looking to monitor their well-being.
  6. LTE Connectivity: Many Samsung watch models offer LTE connectivity, allowing users to make and receive calls, send messages, and stream music directly from their watches, even when their phones are not nearby.
  7. App Ecosystem: Samsung’s Galaxy App Store offers a wide range of apps optimized for their watches. While the selection might not be as extensive as some other platforms, Samsung’s curated app ecosystem ensures that most essential apps are available.
  8. Battery Life: Samsung watches generally provide decent battery life, especially considering their powerful features and bright displays. Depending on usage, users can typically get through a day or more on a single charge.
  9. Regular Software Updates: Samsung actively supports its smartwatches with regular software updates, bringing new features and improvements to existing devices. This commitment to ongoing support enhances the longevity and functionality of their watches.

In conclusion, Samsung watches stand out for their stylish design, robust features, seamless integration with Samsung devices, and a commitment to improving user experience through regular updates. These factors combine to make Samsung watches an appealing choice for both tech enthusiasts and everyday users looking for a reliable and feature-rich smartwatch.

Samsung websites for different regions:

  1. Samsung USA (United States): Official Website: www.samsung.com/us/
  2. Samsung Europe: Official Website: www.samsung.com/uk/For other European countries, you can simply replace “uk” in the link above with the country code, such as “de” for Germany, “fr” for France, “it” for Italy, etc. For example, for Samsung Germany, the link would be: www.samsung.com/de/
  3. Samsung Asia: Official Website (for South Korea): www.samsung.com/sec/For other Asian countries, the links will vary based on the specific country. You can usually find the official Samsung website for a particular Asian country by adding the two-letter country code after “samsung.com/”. For example, for Samsung India, the link would be: www.samsung.com/in/
  4. Samsung Japan: Official Website: www.samsung.com/jp/
  5. Samsung Africa: Official Website: www.samsung.com/africa_en/Please note that the link above is for the English version of Samsung’s website for Africa. Depending on your location and language preference, you may be redirected to a more appropriate subdomain.
  6. Samsung South America: Official Website (Spanish): www.samsung.com/latin/


Please note that Samsung has dedicated websites for various countries and regions. 

samsung watch bands

Elevate Your Style with Samsung Watch Bands:
Top Picks and Where to Get Them

Samsung smartwatches have become popular accessories, blending fashion and functionality seamlessly on your wrist.

One of the best ways to customize and personalize your Samsung watch is by changing its bands.

With a wide variety of stylish and comfortable options available, you can effortlessly switch up your look to suit any occasion.
In this article, we’ll explore some of the top Samsung watch bands and provide links to where you can get them.

  • Samsung Genuine Leather Band:
  • If you’re looking for a classic and sophisticated option, Samsung’s Genuine Leather Band is an excellent choice. Crafted from high-quality leather, this band adds a touch of elegance to your smartwatch. Its adjustable design ensures a perfect fit, and the premium materials ensure durability.
  • Find the Samsung Genuine Leather Band here: Samsung.com


  • Fintie Stainless Steel Band:
  • For a modern and versatile look, the Fintie Stainless Steel Band offers a sleek metal design that elevates your Samsung watch’s appearance. The durable stainless steel construction makes it suitable for everyday wear, and the secure clasp ensures it stays comfortably on your wrist.
  • V-MORO Silicone Sport Band:
  • Active individuals will appreciate the V-MORO Silicone Sport Band, perfect for workouts and outdoor adventures. Made from soft silicone, this band is sweat-resistant and comfortable for all-day wear. The pin-and-tuck closure keeps it securely fastened during your most rigorous activities
  • Carterjett Nylon NATO Strap:
  • The Carterjett Nylon NATO Strap is a great choice for those seeking a casual and rugged look. Constructed from durable nylon material, it’s perfect for everyday wear and outdoor pursuits. The stainless steel hardware adds a touch of style, and the easy-to-adjust design ensures a comfortable fit.
  • TRUMiRR Stainless Steel Milanese Loop:
  • Embrace a touch of elegance with the TRUMiRR Stainless Steel Milanese Loop. This magnetic mesh band is both stylish and comfortable, perfect for formal occasions or daily wear. The adjustable clasp allows for a secure fit, and the woven design adds a sophisticated flair.

With these diverse options for Samsung watch bands, you can effortlessly elevate your smartwatch’s style to match your unique personality and lifestyle. Remember to check the compatibility of each band with your specific Samsung watch model before making a purchase. Enjoy the versatility and convenience of changing your watch bands, and embrace a new level of customization for your Samsung smartwatch!

how to open zip files on iphone

How to Easily Open Zip Files on Your iPhone

Zip files are widely used to compress and bundle multiple files together, making them easier to share and transfer. If you’ve received a zip file on your iPhone and wondered how to access its contents, fear not! Apple has streamlined the process of opening zip files on iOS, and it’s a breeze with the right tools.

Here’s a step-by-step guide on how to do it:

Use the Files App:

  1. Use the Files App:

    • The Files app is a built-in file manager on iOS that allows you to manage documents and files, including zip files.
    • Locate the zip file you received. This could be in an email attachment, a cloud storage app, or a download from a website.
    • Tap on the zip file to select it. If it’s in an email attachment, you may need to download it first by tapping the download icon.
    • The zip file is selected, tap on the “Share” button (the square with an arrow pointing up) at the bottom left corner of the screen.
    • From the sharing options, scroll down and tap “Save to Files.”
    • Choose the destination folder within the Files app where you want to save the unzipped files, or you can select “On My iPhone” to save it directly to your device.
    • Tap “Add” to save the zip file to the chosen location.
    • Now, navigate to the folder where you saved the zip file, and you should see its contents unzipped and ready for use.
  2. Third-Party Apps:

    • If you prefer more advanced zip management capabilities, you can use third-party apps available on the App Store.
    • Find the zip file manager or extractor app (e.g., iZip, WinZip, Documents by Readdle) on the App Store and install it on your iPhone.
    • Once the app is installed, open it, and you’ll typically find an option to import files from various sources, including cloud services and emails.
    • Locate and import the zip file you want to open.
    • The app will automatically extract the contents of the zip file, and you can access them within the app’s interface.
  3. Opening Password-Protected Zip Files:

      • If the zip file is password-protected, you’ll need the password to access its contents.
      • When you attempt to open a password-protected zip file using the Files app or a third-party app, it will prompt you to enter the password before extracting the files.

Simply enter the correct password, and the app will handle the rest, giving you access to the unzipped files.

With these simple steps, you can effortlessly open zip files on your iPhone and access the content they hold. Whether you choose to use the built-in Files app or opt for a third-party zip management app, the process is user-friendly and convenient. Enjoy the flexibility of accessing compressed files on the go and make the most of your iOS device’s capabilities!

How to Efficiently Manage ZIP Files on Your Apple Devices

Embracing the Power of Compression

If you find yourself needing to share large files or create archives on your Apple devices, utilizing ZIP files can be a game-changer. Not only do these compressed files save valuable storage space, but they also expedite the file-sharing process due to their reduced size. Follow these steps to effortlessly compress and decompress files on your iPhone, iPad, or iPod touch.

Compressing Files on iPhone or iPod touch

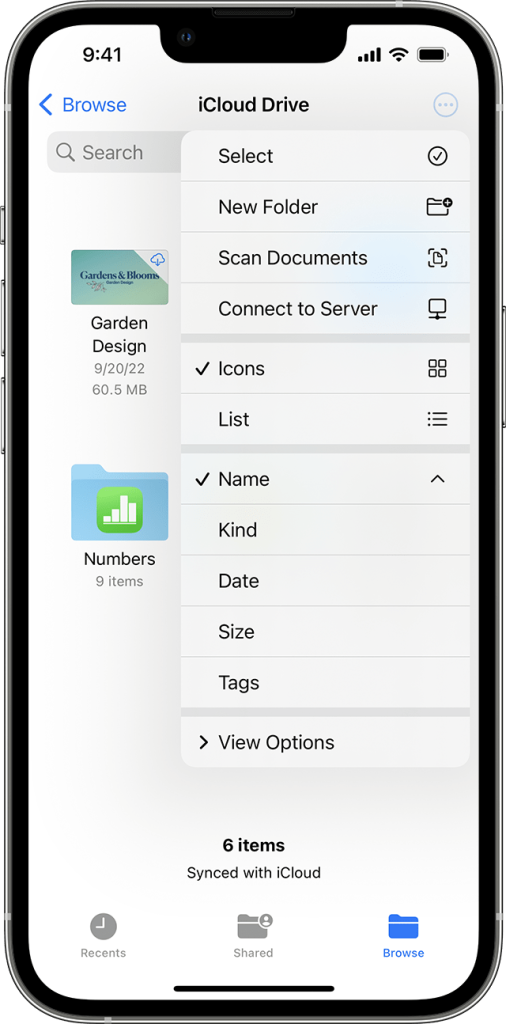
  1. Navigate to the Files App: Open the Files app on your iPhone or iPod touch and select a destination like On My iPhone or iCloud Drive.
  2. Select Files to Compress: Tap the “More” button and then choose “Select.” Pick one or more files that you want to compress.
  3. Initiate Compression: Tap the “More” button again, this time selecting “Compress” to create a ZIP file. For a single file, the ZIP file will have the same name. If multiple files are chosen, a ZIP archive named “Archive.zip” will be created. To customize the name, long-press the ZIP archive and select “Rename.”

    iphone-how-to-zip-files

    phone-how-to-zip-files

Unleashing ZIP Files on iPhone or iPod touch

  1. Locate ZIP File in Files App: Open the Files app and find the ZIP file or archive you wish to extract.
  2. Extracting Files: Tap the ZIP file, and a folder containing the files will be generated. Long-press the folder to rename it according to your preference.

Enhancing File Management on iPad

ipad-os-16-ipad-pro-11in-files-how-to-zip-files

ipad-os-16-ipad-pro-11in-files-how-to-zip-files

Compressing Files on iPad

  1. Access Files App: Launch the Files app on your iPad and choose a location, such as On My iPad or iCloud Drive.
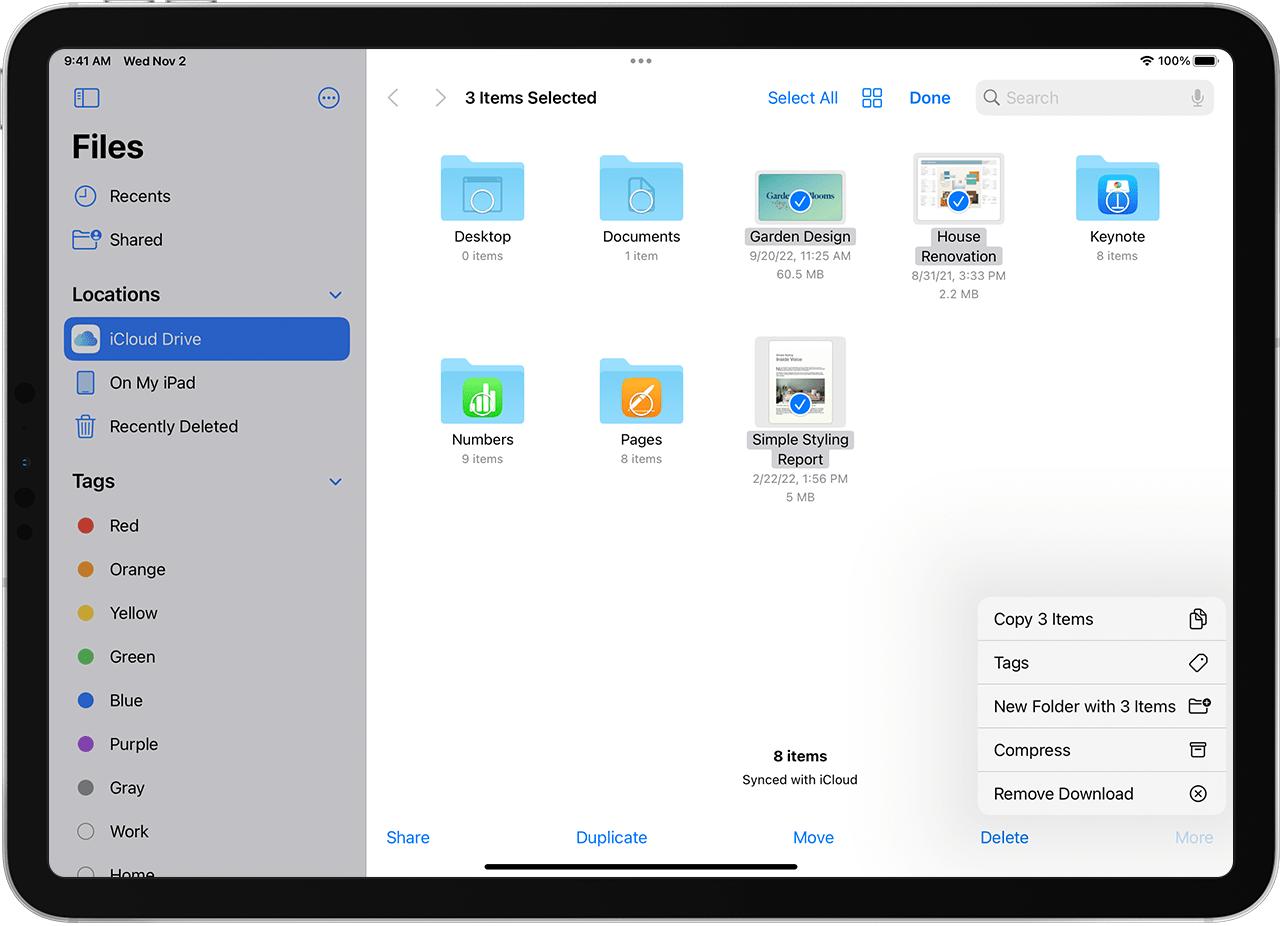
  2. Select Files for Compression: Tap “Select” and choose the files you want to compress.
  3. Initiate Compression: Tap “More” and then select “Compress” to create a ZIP file. Just like on the iPhone, the process differs based on whether you’re compressing a single file or multiple files. Rename the ZIP archive by long-pressing and selecting “Rename.”

Unzipping Files on iPad

  1. Navigate to ZIP File: Open the Files app and locate the ZIP file or archive you wish to extract.
  2. Extracting Files: Tap the ZIP file, and a folder containing the files will be created. Customize the folder name by long-pressing and selecting “Rename.”

By mastering these simple steps, you can effortlessly harness the power of ZIP files for efficient file management on your Apple devices.

How to delete files on iphone

The Challenge of Deleting Files on an iPhone

In the fast-paced digital age, smartphones have become an integral part of our daily lives. Among these, the iPhone has established itself as a powerful and feature-rich device. With its seamless user interface and sophisticated ecosystem, managing files on an iPhone should be a breeze, right?

Unfortunately, as many iPhone users have discovered,
deleting files can sometimes prove to be a surprisingly challenging task.

One of the primary challenges users face when trying to delete files on an iPhone lies in the complexities of the operating system and its diverse storage locations.

Unlike traditional computers, iPhones have a hierarchical file system that is mostly hidden from the average user. This can make locating and managing files somewhat convoluted, particularly for those who aren’t tech-savvy.

Apps, for instance, are often scattered across various home screens and folders, and the process of uninstalling them isn’t as straightforward as it may seem. Users need to enter the “jiggle mode,” identify the tiny “X” symbol, and then confirm the deletion—a process that can be mystifying for first-time iPhone owners.

Another aspect that adds to the challenge is Apple’s approach to cloud storage and syncing.

While services like iCloud provide users with seamless access to their data across devices, it can inadvertently lead to complications when attempting to delete files. Users might find that deleting a file on one device doesn’t automatically delete it from iCloud, and vice versa.

As a result, files may continue to linger in the cloud, consuming precious storage space and causing confusion.

The photo and video management can be equally puzzling. Though the Photos app is designed to simplify the organization of images, the process of permanently deleting them can be intimidating. Users often worry about accidentally removing cherished memories due to unclear instructions or a lack of intuitive interfaces.

Moreover, Apple’s emphasis on user data security and privacy adds another layer of complexity.

While these features are undoubtedly beneficial, they can make file deletion more challenging for security-conscious users. Encrypted files and strong authentication measures may require additional steps to ensure files are properly removed from the device.

For those relying on third-party cloud storage services or apps, complications can arise when attempting to delete files from within these applications. Users may need to navigate through different menus or consult online guides to understand how to remove files effectively.

The lack of a universal “Trash” or “Recycle Bin” feature on iOS further intensifies the challenge.

Unlike desktop operating systems, where deleted files are initially moved to a temporary storage location, iPhones typically delete files permanently without a safety net. This means users must exercise caution and avoid hasty deletions.

While iPhones are undoubtedly sophisticated devices that offer a seamless user experience, deleting files on these smartphones can present its own set of challenges. The intricacies of the operating system, scattered app management, iCloud synchronization complexities, and data privacy measures can make file deletion seem like a labyrinthine process.

As technology continues to evolve, one can hope that future iOS versions will refine file management, making it more intuitive and user-friendly for all iPhone users.
Until then, a little extra care and understanding are essential when trying to free up space and manage files on an iPhone.

The steps might vary slightly depending on the version you’re using.
Here’s how you can delete different types of files on an iPhone:

On your iPhone

  1. Open the Files app and tap the Browse tab.

  2. Under Locations, tap the location of the files that you want to delete.

  3. Tap the More buttonMore button, then tap Select.

  4. Select the files that you want to delete, then tap the Delete buttonDelete button. To delete a single file, you can also touch and hold the file, then tap Delete.

On your iPad

  1. Open the Files app.

  2. Under Locations in the sidebar, tap the location of the files that you want to delete. If you don’t see the sidebar, tap the Show Sidebar buttonSidebar button.

  3. Tap Select.

  4. Select the files that you want to delete, then tap Delete. To delete a single file, you can also touch and hold the file, then tap Delete.

Rediscover Your Lost Files: Recover Deleted Items on iPhone and iPad

A Second Chance for Accidentally Deleted Files

We’ve all been there – that sinking feeling when you realize you’ve deleted a file by mistake. Fret not! Your iPhone or iPad has a safety net known as “Recently Deleted,” giving you a 30-day window to retrieve files you thought were gone forever. Here’s how to reclaim your lost data:

Rescuing Files on Your iPhone

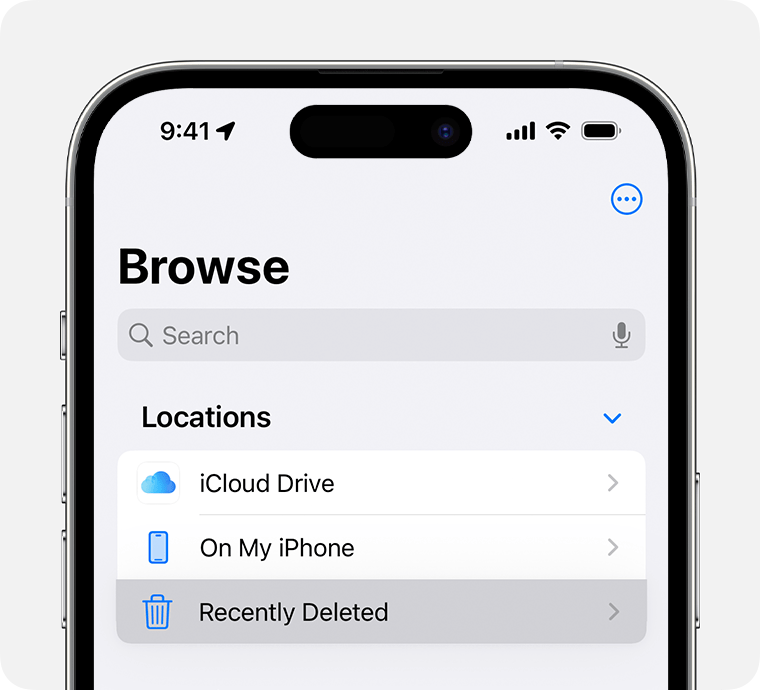
  1. Access the Files App: Open the Files app on your iPhone and navigate to the Browse tab.
  2. Explore Recently Deleted: Under Locations, tap on “Recently Deleted.” It’s like a digital safety vault where your deleted files find temporary refuge.
    ios-16-iphone-14-pro-how-to-delete

    ios-16-iphone-14-pro-how-to-delete

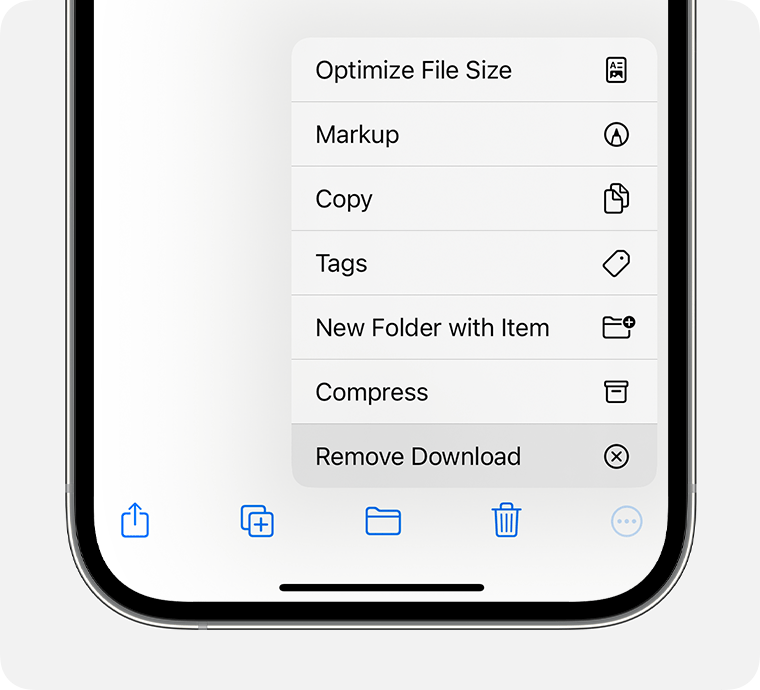
  3. Engage the Recovery Process: Tap the “More” button, denoted by three dots, and then select “Select.” This action allows you to pick the specific files you wish to recover.
  4. Select and Recover: Choose the files you want to retrieve, and then tap “Recover.” If you prefer a quicker route for a single file, simply touch and hold the file, and the option to recover will appear.

Effortless File Recovery on Your iPad

A Quick Guide to Retrieve Deleted Files

Losing files on your iPad can be disheartening, but fear not – the iPad’s Files app provides a straightforward solution to recover deleted items. Follow these simple steps to bring back your files from the Recently Deleted folder:

  1. Launch the Files App: Open the Files app on your iPad. If the sidebar isn’t visible, tap the “Show Sidebar” button to reveal it.

    ios-16-iphone-how-to-delete-files.

    ios-16-iphone-how-to-delete-files.

  2. Navigate to Recently Deleted: In the sidebar under Locations, locate and tap on “Recently Deleted.” This section acts as a temporary holding space for your deleted files.
  3. Initiate Selection: Tap the “Select” option to mark the files you want to recover. This step enables you to choose specific items for retrieval.
  4. Recover Your Files: After selecting the desired files, tap “Recover” to bring them back. For a quicker recovery of a single file, you can also touch and hold the file and then tap “Recover.”

A Rescue Mission Made Simple

The Recently Deleted feature on your iPad ensures that accidental deletions don’t lead to permanent losses. By following these steps, you can effortlessly retrieve your files and restore them to their original locations. Don’t let the fear of deletion linger – empower yourself with the knowledge to recover your digital assets seamlessly on your iPad.

  1. Deleting Apps:
    • Find the app you want to delete on your home screen.
    • Press and hold the app icon until all the icons on the screen start to jiggle.
    • You should see an “X” or a small delete icon in the corner of the app icon.
    • Tap the “X” or the delete icon to remove the app.
    • Confirm the deletion when prompted.
  2. Deleting Photos and Videos:
    • Open the “Photos” app on your iPhone.
    • Navigate to the album or the “All Photos” section where the media you want to delete is located.
    • Tap on the photo or video you want to delete to view it in full screen.
    • Tap the trash can icon located usually at the bottom right corner of the screen.
    • Confirm the deletion when prompted.
  3. Deleting Files in iCloud Drive:
    • Open the “Files” app on your iPhone.
    • Navigate to the location of the file you want to delete, whether it’s in “iCloud Drive” or a connected cloud storage service (if you use one).
    • Tap and hold the file until a menu appears.
    • Tap “Delete.”
    • Confirm the deletion when prompted.
  4. Deleting Safari Browsing History and Website Data:
    • Open the “Settings” app on your iPhone.
    • Scroll down and select “Safari.”
    • Scroll down again and tap on “Clear History and Website Data.”
    • Confirm the deletion when prompted.

Remember that when you delete files from your iPhone, they may still be recoverable from your iCloud backup if you have one. If you want to ensure complete deletion of sensitive data, consider using iOS’s built-in encryption and erasing options or restoring your iPhone to factory settings.

Always be cautious when deleting files, as some deletions might not be reversible, especially if you don’t have a backup of the data you want to remove.
It’s a good practice to back up your important data regularly to avoid data loss.